
Life, especially when it comes to DIY, is never straightforward.
You’d think that the traditional and regular four-sided outline of tiles should make them effortless to install. The issue is, that the shape and dimensions of room walls, corners, and household fittings are often less than perfect, and you’re guaranteed that the area you’re covering will not conveniently accommodate a whole row of complete tiles.
So, you have no choice but to cut them to fit.
Trust me, it’s not as scary as it initially sounds. I consider it my mission to explain how to cut tiles accurately and without mishap — allowing you to become a consummate all-around DIYer.
How To Cut Tile Without Chipping
As with any cutting project, the keys to success are accurate measurement and the correct tools.
However, unlike addressing timber, tiles carry the added challenge of being notoriously fragile. One small, over-enthusiastic address, and you’ll remove too much material, crack or split the tile, or end up with an uneven finish.
Depending on where you look online, you can find numerous ways of reshaping tiles — including handheld saws, angle grinders, and tile nippers. However, if you demand accuracy and a pleasing finish that doesn’t look like it’s been completed by a drunk Neanderthal, there are only two methods you should consider — a manual tile cutter and a wet power saw.
Tile Cutter vs Tile Saw
Manual Tile Cutter
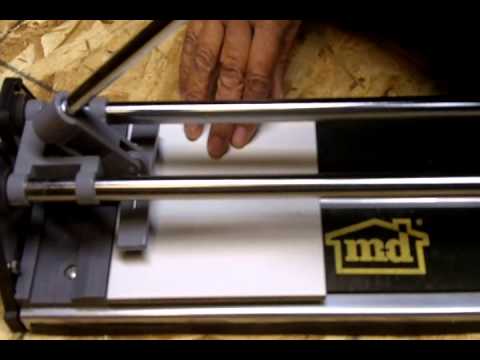
Looking similar to a hardcore paper guillotine, manual tile cutters promise affordability combined with precision — making them ideal for the casual to medium intensity DIYer.
The method of address is straightforward. Position your tile in the unit, pull the wheel blade across its runners to score the lacquer, and then use the lever arm to snap the tile along the score mark. Simple.
The downside is their inconsistency and fickleness — usually due to the differing strength of tiles and their veneers — meaning you have to manually apply more or less pressure dependent on the porcelain or ceramic construction.
Success is mainly trial and error — usually error — combined with experience. Too little downforce will lead to an insufficient score, making it virtually impossible to break the tile along the cut mark.
Conversely, too much pressure can create a jagged edge, remove decorative veneer, or crack the tile completely while still in the unit. Trust me, when you use one of these machines, be prepared to sacrifice quite a number of tiles.
Pros of Manual Tile Cutters
- Cheap to purchase compared to wet saws.
- Compact, in contrast with bulky tile saws.
- Straightforward — score and snap.
- Portable — significantly lighter than a powered machine.
- Little risk of accident or physical injury.
- Quick set up — put it on your worktable, and go.
- Ideal for straight lines.
Cons of Manual Tile Cutters
- Inconsistent.
- High probability of jagged, coarse edges.
- Requires trial and error to master.
- Guarantee of some wrecked and unusable tiles.
- Can only cut straight, no bends or curves.
Powered Wet Tile Saw
The ultimate tile cutting unit — powerful, accurate, and protective, but also hard on the wallet.
They appear very similar to a portable table saw, with their integrated guide and electrical spinning circular blade. Place the tile on the saw table, position it in preparation for the cut with the buffer bar, and turn on the machine.
You then gently push the tile through the diamond-tipped blade, while water from an underneath reservoir or external hose pipe cools the material to prevent burning and inhibits airborne dust.
Experienced users can create elaborate curved edges — impossible with a manual unit. Furthermore, these power tools can tackle the densest of mediums, including glass. The downsides are their size, weight, cost, and crucially, risk. A diamond blade rotating at 8000 rpm will make light work of durable glass tiles — it won’t even break a sweat chopping off your fingers.
Pros of Wet Tile Saws
- Accurate.
- Cope with dense mediums.
- Can cut non-linear lines.
- Inhibits airborne dust and tile burn.
- More rapid than a manual machine.
- Accommodates larger tiles than a tile cutter.
Cons of Wet Tile Saws
- Larger, heavier, and bulkier than a manual machine.
- Require access to an electrical source.
- Need filling with water or connecting to an external supply.
- Pricey compared to manual units.
- Require significant safety precautions.
- Noisy.

How To Use a Hand Tile Cutter
Equipment you need:
- Manual tile cutter — the rail length should be at least one inch greater than your tile.
- Carpenter’s pencil.
- Straight edge.
- Workbench.
- Dust mask.
- Rubbing stone.
- Measuring tape.
Step 1 — Preparation
- Accurately measure the area in which the tile needs to fit — remember the crucial adage of measure twice, cut once.
- Using the carpenter’s pencil and the straight edge, draw a light line upon the glazed tile face where you wish to make the cut — in order to make the tile fit into the measured space.
- Position your manual tile cutter on a workbench or table — orientate it so that you will be pushing the rail blade away from your body to make the score.
- Most manual cutters include molded holes to allow anchoring to your desk. If you don’t wish to permanently locate your tool, use a couple of clamps instead.
- Check that the blade runs smoothly along the guide rails — if required, add a little lubricant.
- Safety equipment isn’t as crucial compared to using a wet saw. However, you may wish to wear a dust mask to shield yourself against the minimal airborne particles created when you split the tile.
Step 2 — Using a Tile Cutter to Score
- Position your tile in the manual cutter with the lacquered face upwards.
- Ensure that one side abuts tightly and evenly to the end stop.
- All manual tile cutters have a guide line — a narrow and straight metal strip that runs along the machine’s base plate. Check that your pencil-drawn line is located directly above this guide.
- Apply gentle to moderate pressure to the lever, and then push the blade away from your body, slowly traversing the measurement line to score the tile’s lacquer. Try to keep your downward pushing force even as you cross the tile face.
- Keep pushing until the blade stops when you reach the end of the rails.
- ONLY SCORE ONCE! Multiple passes can result in uneven edges or tile breakage.
Step 3 — How To Use Tile Cutter Manually To Snap the Tile
- With the blade in the end position, slowly press down on the lever, gradually increasing pressure. The two side flanges adjacent to the blade will spread the force evenly across the tile — you will hear a cracking sound as the tile splits along the line.
- If your tile breaks away from the desired line — you need to start again. This is typically due to applying insufficient pressure during the scoring stage.
- Raise the lever to remove the foot flanges and blade away from the tile face.
- Carefully remove the two tile pieces, ensuring you don’t accidentally scratch the tile by brushing the carbide blade.
- Don’t throw away your offcut! It may be the perfect size for a space later in your project — saving you from cutting another whole tile.
- Smooth down the edges of the cut tile with sandpaper or a rubbing stone.

How To Use a Powered Wet Tile Saw
Equipment you need:
- Wet tile cutter.
- Access to water.
- Straight edge.
- Whiteboard marker or carpenter’s pencil.
- Workbench if required.
- Safety equipment — dust mask, industrial gloves, and eye
- protectors.
- Sandpaper.
- Measuring tape.
Step 1 — Preparation
- Set up your tile saw according to the manufacturer’s instructions.
- If your saw incorporates a cutting table, ensure that it’s level on the floor.
- Should your wet tile machine be a more portable type without the included table, position it on your workbench.
- Fill the water reservoir until you reach the maximum fill line.
- Measure the dimensions of the space that your tile needs to fit into.
- Using the measurements, mark the tile with a straight edge and a pencil or whiteboard marker. Always write on the glazed surface, not the underside — pen ink can seep into the clay backing and be visible from the tile face.
- Check that the blade is sharp and firmly secured.
- Power up the saw to check it’s operating ok — visually inspect the spinning blade to ensure it’s running true.
- Turn off the machine, unplug, and then set the guide plates to the correct width and lock them into position. Most machines feature a pair of guides that incorporate right-angled recesses to secure the tile in place.
Step 2 — Cutting With a Wet Power Saw
- Position the tile between the guide plates with the glossy face upwards, checking that it rests evenly on the cutting table. Ensure that the blade tip meets the beginning of your pencil or marker pen line.
- Don your protective equipment.
- Plug in the wet saw, check the blade is clear, and turn on the machine.
- Allow at least 15 seconds for the blade to reach top speed.
- Slowly and gradually introduce the tile into the blade — feeding with your fingers on either side of the tile, exerting a little down pressure to prevent kickback, and ensuring they’re at a safe distance from the spinning teeth.
- Remember, your job is to steadily guide the tile, not aid with cutting. So don’t try and rush the tile through the blade — let it do the hard work.
- Once the tile has passed completely through, remove your fingers from the tile and then both turn off and unplug the wet saw.
- Only remove the tile sections once the blade has completely ceased rotating.
- Using a damp cloth, remove any remaining measurement marks from the tile.
- A wet saw with a keen blade usually means you don’t have to sand the tile edges smooth. However, if they do need a little attention, address them with sandpaper or a rubbing stone.
- Follow the above procedure for all your tiles. When complete, empty and clean the reservoir tray, which will be filled with a mixture of water and tile dust.

Wet Tile Saw Safety
With care and precision, wet tile saws are safe — for both the amateur DIYer and trade pro. However, since you’re wielding a powerful and sharp motorized blade, you do need to take a few precautions.
Here are my ultimate tips for operating a tile saw safely and effectively:
- Never operate the machine without eye, respiratory, and hand protection. If required, don ear defenders also.
- Never wear loose and baggy apparel when operating your saw. Also, avoid any jewelry such as watches, bracelets, and rings that may find themselves catching the blade.
- Always operate the wet cutter with any included guards in place.
- A dull blade is a dangerous blade. If it’s losing its sharpness or becomes damaged — replace.
- Keep fingers at least two inches on either side of the blade. Never place your digits directly in front of the cutting edge.
- When not in use, while positioning the tile, or when replacing the blade — unplug it from the mains.
- Utilize a brush to remove dust, debris, and detritus from the cutting area — never ever use your precious fingers.
Conclusion
Whether you use a manual machine or a powered wet unit — always measure precisely, make a clear-cutting mark on your tile, and take your time with the shearing or snapping process.
I hope that you found this article enjoyable, interesting, and informative. If you have a buddy who you believe may also benefit from this how to use a tile cutter rundown — please share!
Using a Tile Cutter FAQs
Q: How To Cut Small Tiles?
Some miniature tiles may be too small to fit onto a sliding cutter, and too dangerous to feed through a wet power saw. Instead, utilize a pair of tile nippers.
Q: Can I Use an Angle Grinder To Cut Tiles?
You could, but it’s risky and will deliver unpredictable cuts. The angle tile cutter approach carries the inherent problems of:
- A blade that’s too coarse for a smooth tile edge.
- User inaccuracy — the smoothness of the cut will depend on how steady your hands are.
- High risk of kickback.
- The danger of burning the tile without a water reservoir.
- Having to secure the tile in a vice without snapping it.
Q: How To Measure Tile Cuts on Diagonal Tiles?
Diagonal — sometimes known as diamond — tiles deliver a novel aesthetic feature to kitchens and bathrooms. When measuring, remember you need to check the distance from point to opposite point — not side to side as with square or rectangular tiles.
Q: Do You Cut Ceramic Tile Face Up or Down?
Whether using a manual cutter or a wet tile saw, always cut with the glossy side of the tile face up.
Q: Why Is My Tile Cutter Breaking Tiles?
This issue is common to manual tile cutters, not powered saws. The usual reasons are:
- Insufficient pressure when making the score line.
- Making more than one pass for the score.
- Snapping the tile without it lying flat on the cutting plate.
- A blunt carbide blade wheel on your cutter.
- The cutting wheel is jammed with detritus, preventing it from rotating.


