
Airless Paint Sprayer Troubleshooting
For professional and DIY painting projects, paint sprayers knock rollers and brushes out of the ballpark. They save you time and money with their efficiency, high-quality finishes, and ease of use. However, these machines aren’t perfect, and sometimes they fail to perform.
When this happens, being able to fix the problem will get you back on track. To help you get the most out of your appliance, I’ve compiled a complete guide to airless paint sprayer troubleshooting. So whether you own a Graco, Titan, Wagner, or any other brand of labor-saving airless painting device, you can maintain and repair it.
The Ultimate Guide to Airless Paint Sprayer Troubleshooting
The airless paint sprayer is considered the workhorse of the power-painting niche. The range of sprayers on offer is expansive, with models targeting pros, industrial-scale contractors, avid DIYers, and casual weekend warriors. Here are some common problems and their solutions to enable airless paint sprayer troubleshooting.
1. Motor Problems
You might encounter two different problems with your motor. You could plug into your power outlet, turn your machine on and find that the motor isn’t powering up. Alternately, you may find that it intermittently shuts off without warning.
Motor Not Firing Up
- Not enough pressure — crank up the pressure. Rotate the control knob in a clockwise direction.
- Faulty electric outlet — use a device you know that works or a multimeter to test your power outlet. You might need to replace a circuit breaker or fuse, or select a different power source.
- Sprayer electric cord or extension cord damaged — check the electrical leads for faults or breaks and replace them if necessary.
- Pump has seized — residual paint or frozen water in the pump can prevent operation. Use a process of elimination — turn the sprayer off, unplug it, and pop it somewhere warm to defrost for a few hours. Once it’s thawed, try and start it up. If it still doesn’t work, dried paint could be responsible — a pump cleanup will be required.
- Damaged control or motor, or the motor doesn’t operate with the pump removed — these faults require the attention of an approved retailer or service center for your brand of airless sprayer.
Motor Cuts Out
The main reason your motor might intermittently fail to operate or shut down without warning is overheating. If you ignore this and don’t fix the cause, you could end up with a damaged unit. Ensure you check the following tips to keep your motor operational.
- Blocked vent holes in the enclosure — make sure your vent holes are clear of any obstruction and kept away from overspray.
- Sprayer is enclosed — your unit must be free from any type of cover and open to the air for the motor to keep cool and operate smoothly.
- Wrong extension cord — check the extension cord. Make sure you’re using one with an adequate gauge for the unit and isn’t too long.
- Too much voltage from an unregulated generator — only use an electrical generator with a compatible voltage for your sprayer.
- New motor required — once you have ruled out all the above causes, it could be that your motor is past repair and needs replacing. This is a job for the experts. Contact the appropriate service center or sprayer technician for your model.
2. Airless Paint Sprayer Won’t Prime
Priming your airless paint sprayer allows your chosen coating to be drawn from the container into the spray gun for atomization. Most sprayers possess a control knob indicating prime or spray mode. If when you set the machine to prime, the material doesn’t pull through the system, it’s likely there is a fault somewhere.
Is your machine failing to build pressure, and the paint isn’t pulling through the suction tube? If you’re nodding your head, try some of these fixes.
- Prime/spray valve is set incorrectly — yes, I know this might be right under your nose, but it’s worth checking. The prime/spray valve must be in the prime position and not the spray setting for the unit to prime.
- Suction tube isn’t fully submerged in paint — ensure your suction tube is completely immersed in your material.
- Debris has built up on the inlet screen — inspect the inlet screen and clean off any dried paint or dirt.
- Inlet or outlet valve ball is jammed or fouled up — some machines feature a PushPrime button, which loosens the inlet valve if depressed twice. The unit can then be reprimed, and you can continue spraying.
Other models necessitate the removal of the outlet and/or inlet valves for cleaning. Once replaced, reprime the unit. Make sure you don’t lose the valve ball or spring and check the outlet ball moves freely in its housing before replacing.
- Suction tube leaks — inspect the suction tube for cracks or a vacuum leak.
- Worn o-ring on the suction cup — examine the o-ring on the suction cup for wear and replace if necessary.
- Blockage caused by paint debris — paint can sometimes contain impurities, or dirt or debris may have contaminated it. Straining your paint before use can prevent this. Clear the obstruction and filter out particles from the material.
- Debris-blocked or deteriorated spray/prime valve — seek advice from an authorized service technician for your sprayer.
In any event, if you rule out the causes listed and you’re still experiencing priming issues, contact an approved service center or the manufacturer.
3. Missing or Ill-fitting Seals and Parts.
Correctly fitted components and good seals are crucial to keeping your material running through your sprayer. Here are a few things that can prevent a smooth flow of fluid.
- Loose suction tube — disconnect the tube and check it’s clean. Replace it, ensuring a tight fit. Keep in mind — make sure the tube is inserted as far as it will go, to attain a good seal.
- Ill-fitting paint container — a paint cup that isn’t threaded properly and sitting tight on the paint gun won’t achieve enough pressure build-up to spray material. Make sure the paint container is screwed securely to the nozzle assembly and tightened properly.
- Air valve tube won’t function — a tube with attachments at either end can be located under the hood of your paint sprayer. Its role is to supply air pressure to operate your paint gun. Ensure that both ends of the tube are connected and the valve seal is in place.
- Nozzle seal is missing — during cleaning, seals can become unseated. Examine the nozzle seal — is it in place? If not, replace the nozzle.
- Clogged air filter — dust and debris can build up in your air filter, which causes an obstruction. This results in a lack of pressure and a failure to spray. Check the air filter and clean or replace it.
- Material is too viscous for the machine or spray tip — some thicker coatings are too heavy to pass through the paint gun nozzle. When using super-viscous paints, thin them down in line with the manufacturer’s instructions.
4. Fluid Leaks
When using paint, slight leaks are inevitable when you fire up or shut down your paint gun. However, if you encounter material escaping all the time, something is amiss and requires addressing. The main causes of unwanted medium discharge are:
- Loose nozzle — check the nozzle is both fitted and tightened correctly.
- Worn nozzle — with extended use, the nozzle on your paint gun ages and wears down. If you think this could be the cause of bothersome drips — change it out for a new one.
- Worn or missing nozzle seals — seals prevent seepages and help keep your paint sprayer in working order. Check they’re in place and examine them for signs of deterioration. If they’re missing or worn, replace the nozzle.
- Paint build-up on the air cap or nozzle — solidified paint on the air cap or nozzle, leads to dripping. This is a quick fix — clean it thoroughly.
- Fluid seeps from the nozzle (when the gun trigger isn’t engaged) — a poorly seated or loose needle allows the material to leak — as does a needle packing nut screwed in too tightly. It prevents the needle from moving.
To overcome this — loosen the packing nut, taking care not to damage it. Alternately, examine the needle for wear or damage, or particles trapped between the two — clean or replace as appropriate.
- Incorrect nozzle size installed — using the wrong nozzle in your spray gun will lead to fluid leaks. Choose the correct nozzle size.
- Paint cup leakage — check the diaphragm or gasket for wear and replace if needed. Oil above and below the lever to ensure smooth action. For leaks around the side pins, on the nut under the lid, or nipple — use Loctite to seal them.
- Needle packing nut — a loose packing nut holding the needle in place will allow fluid to escape. Follow the manufacturer’s directions for tightening the nut, taking care not to damage it. Lubricating the shaft of the needle where it passes through the packing nut assists in it moving freely.
5. Reduced or No Material Flow
You’re all ready for some paint spraying action — the unit has power, it’s set up and your material has been added, but you engage the trigger and little or no spray appears. Some quick fixes you can employ include:
- Clearing blockages — parts of your system have become clogged with dried paint, such as the spray tip, suction hose, or air vent. I can’t emphasize enough how important it is to clean your machine after every use to prevent blockages occuring. Clean your sprayer according to the manufacturer’s instructions to avoid clogging and keep your sprayer in tip-top condition.
- Settings aren’t right — using the correct setting for the material you’re spraying will keep the flow going. You may need to increase the pressure, air, or fluid delivery to get your paint dispensing again. The manufacturer’s instructions included with your unit tell you all about the different settings for many mediums, so use it as a guide.
6. Inconsistent Spray Patterns
Disaster comes in different forms when spraying paint — your coating is too thick, runs, or it starts to slide down the wall as it’s drying (otherwise known as sagging). The following simple fixes can have you back on track.
- Dial your material flow down a fraction — you might have it set too high.
- Turn up the airflow — it could be set too low.
- Speed up your spraying technique or turn down the flow — applying too much paint will lead to inconsistent finishes.
- Thin down more viscous materials — in line with the paint manufacturer’s directions.
- Examine your nozzle for clogging from dried paint — clean it if necessary.
- Check the air filter for debris or wear — change it out if it looks like it’s seen better days.
- Paint container isn’t securely attached to the unit — this results in insufficient pressure for consistent spraying. Make sure it’s fitted correctly and is tight.
7. Spray Jet Pulses
Does your paint stream flutter in and out rather than appear as a consistent flow? The causes and solutions to resolve this issue include:
- Not enough paint left — the material in your paint cup could be running out — it’s time to refill.
- Blocked air filter — your air filter might have passed its sell-by date and become clogged, rendering it ineffective — change it out for a new one.
- Unseated air valve tube — ensure each end of the air tube is properly connected.
8. Excessive Overspray
How much overspray comes with an airless paint sprayer? The answer — an airless paint sprayer doesn’t deliver no overspray — but it shouldn’t be excessive, covering everything in sight. If you’re experiencing extreme overspray, you could end up wasting material and painting things you don’t intend to — so consider these adjustments to reduce it.
- Hold the gun closer to your surface — spraying too far away from your target area can increase the overspray. An ideal spraying distance of between 6 to 8 inches is recommended.
- Dial down the air pressure — too much airpower increases overspray.
9. Insufficient Coverage
Splotchy gaps or coverage that’s so light you can see through it isn’t a good thing. To accomplish that flawless finish and prevent this from happening, follow these pointers.
- Slow your spraying technique down — for effective coverage, move a little slower with your spray gun. It will save you time in the long run.
- Increase the paint flow — insufficient fluid might be passing through your spray tip to deliver that perfect finish. Turn it up in small increments until you get the desired coverage.
- Decrease the air pressure — too much air affects the atomization, so remedy it by taking it down a few notches.
10. Paint Gun Spits
Is your airless paint sprayer spitting material instead of delivering a steady stream? Air entering the system in locations — apart from the air cap — is often the culprit. To solve this problem:
- Make sure your nozzle is seated properly — this stops air from entering the material flow.
- Clean the inlet or outlet valves — if they’re blocked up with dried paint or debris, they will allow air into the system.
- The primer or spraying valve could be clogged — this is a job for the sprayer maintenance professionals. Contact a specialist technician.
11. Unit Won’t Build or Maintain Pressure
Paint sprayers operate using high air pressure to atomize paint, delivering a fine mist to give a flawless finish. If the pressure isn’t spot on, you either end up with no spray or insufficient coverage. Test the following options one by one to get your paint spraying again.
- Replace your spray tip — ta worn spray tip won’t atomize well.
- Change the size of your spray tip — make sure the tip you’re using is compatible with the medium you’re spraying. Maybe it’s too large and needs to be downsized.
- Ramp up the pressure — if it’s too low, it will render the sprayer ineffective.
- Clean the filters — clogs in the pump filter, inlet screen, or gun filter could be blocked with debris or dried paint. Clean them individually and replace if you need to.
- Check the valve — if fluid escapes from the return hose when the PRIME/SPRAY valve is set to spray, you won’t maintain pressure. Change out the valve for a new one.
- Inspect the siphon/suction tube for an air leak — re-tape with PTFE tape or tighten it.
- Examine all connections — if a connection has worked loose it will allow air to escape. Make sure they’re all fitted correctly and are tightened.
- Service the fluid section following the manufacturer’s recommendations — Worn, dry or dirty packings or deteriorated valve balls can cause internal fluid leaks, leading to a drop in pressure.
- Try reversing the valve seat or replace it — worn valve seats should be maintained in accordance with your owner’s manual.
- Thin down your paint medium — it could be the paint you’re using is too viscous. Either thin it down, or use a larger spray tip.
- Strain your paint — this will remove any dirt, debris, or coarseness that can cause pressure dropouts.
- Shorten your spray — if the hose length is too long, the correct pressure can’t be achieved.
- Clean the filter accessory (if fitted) — not all sprayers have this, but if yours does, make sure it’s free from debris and dirt.
- The motor fails to rotate with power onconsult an authorized technician.
12. Piston Pump is Worn
Materials are pumped through your machine by the piston. If this is worn or stuck, your paint medium can’t be propelled through your unit. Excessive material leakage or a lengthy priming duration could be the result of an underperforming piston. Change it out for a new one, following your manufacturer’s guidelines.
Keep Spraying
An airless paint sprayer is a fantastic tool to have in your arsenal, whether you’re a weekend warrior, avid home DIYer, or professional and industrial contractor. Yet, like any other electrical or mechanical device, there are times when the gremlins appear and they don’t function properly.
In my guide, I’ve covered the most common issues that crop up. Hopefully, this will enable you to solve problems quickly to get you painting up a storm.
That said, keep in mind, there are times when you’ll have to refer to qualified technicians for your particular brand of paint sprayer — some issues are outside the realm of an airless paint sprayer troubleshooting quick self fix.
Our Rating: 4.9
A powerful 0.625 horsepower sprayer that can deliver the most viscous of mediums effortlessly. Boasting a dispense rate of 0.47 gallons per minute, large projects can be completed swiftly. Ideal for pro-users and hardcore DIYers, this unit, with its 515 tip and continuous pressure delivery — promises a flawless finish.
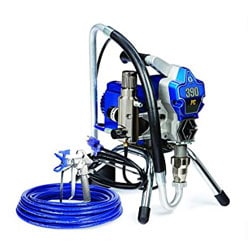
Features
- Lengthy 50-foot hose.
- Chrome-plated stainless steel frame.
- Ideal for property renovations and large-scale outdoor work.
- On-the-job pump replacement.
Airless Paint Sprayers — Our Top Picks
| IMAGE | PRODUCT | DETAILS | ||
|---|---|---|---|---|
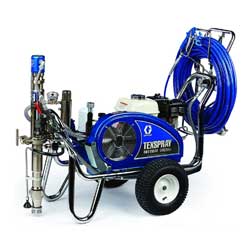
|
Features
|
Check Price at Amazon Nerds Review Nerds Review | ||
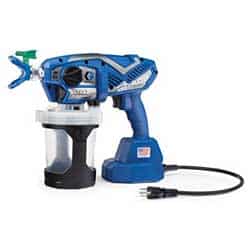
|
Features
|
Check Price at Amazon Nerds Review Nerds Review | ||
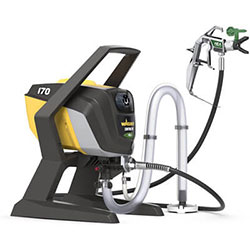
|
Features
|
Check Price at Amazon Nerds Review Nerds Review |


